Monday, March 25, 2013

furniture revival continued

as you know i recently started buying, fixing up and reselling furniture. as a general rule, i focus on brass pieces. both because they're really beautiful and not that much work on the clean up.

here are a couple of my pieces - and be sure to click through to take a look in more detail.


Well, as a next step, I started finding that I was gravitating towards bigger furniture pieces, like this awesome settee:


But, it's not the most modern looking - and I thought, it can't be that difficult to recover it. Only, i have no skills in this department at all. meaning - it was time to find a course to invest in. and one that doesn't cost much money given the goal of the year. unfortunately that means the class is in Etobicoke, but its a third of the price of downtown! furtherly unfortunate, is that i'm on a wait list! but when it happens, and when i turn the above, into the below - i will be that much closer to my goal of no debt in 2013.


Tuesday, March 19, 2013

clean mexican night

i love Chipotle bowls - they are so delicious, but eating out is bad for two reasons with my changed lifestyle. 1) the bowls aren't clean - while delicious they are a "cheat night" event. 2) i shouldn't be eating out and spending that money - not when i can recreate something really quite similar at home.

and so, we put together mexican night! i recreated the Chipotle bowls, while my boyfriend created a burrito from the same ingredients.


Ingredients
- 1/2 an onion, chopped
- 1 red pepper, chopped
- 1lb stewing beef
- 1 tbsp cumin
- 1 tbsp chili powder
- 1 tbsp onion powder
- 4-5 garlic cloves
- 1 can black beans 
- 1 cup brown rice
- 1/2 cup chopped spinach
- Greek yogurt, salsa (no sugar added) and shredded (light) cheese for toppings


Recipe
- Heat up the olive oil, and fry the onion and red peppers until the onions start to brown and the red peppers soften
- Add the beef and spices to the onion and pepper mix
- Cook for about 5 more minutes, until the beef is cooked

At that point assemble the bowl or burrito, depending on what you'd like. And add your toppings.

it was a really nice break from the usual dinners of salmon or chicken and a healthier alternative to what i would have eaten out! let me know how it turns out for you. 


garden show groupon

i unsubscribed from groupons to prevent the urge to spend money, but i re-subscribe to one or two. i know i shouldn't have, but i really missed the emails in the morning! 

i am though being really strong, and haven't bought any up until one came through for the National Home Show. It was a two for one coupon, and was heavily promoted by Bryan Baeumler. and i am a HUGE fan of HGTV and specifically Bryan.

so, i bought it. and i planned on going with my parents and boyfriend on the friday that Bryan was going to be there. planning fail 1 - turns out i misread the calendar, and not until i was on the way to the show did i notice that in fact, it wasn't until the next week he'd be there.

i shook off the disappointment though, and headed in. planning fail 2 - my boyfriend was working a little late, and the ticket was for 2 person admittance, at the same time. luckily on this one, the security guard was really understanding and let us in separately.

we first of all tackled "Canada Blooms" which was a large room of individual floral and garden displays. i don't have a garden, but i did once work for a greenhouse, so i have great appreciation for flowers and gardens - it was great, some really beautiful things. my only true complaint was that it wasn't big enough and there weren't a ton of deals on flowers - which i was hoping for. take a look at some of the displays.

There were tulips everywhere, and in really great colour combinations. i love this tulip bed - it screams spring!
In addition to tulip, pussy willows were also everywhere. 

a really eye catching garden display - certainly beats a gnome!
not quite flowers, but these succulents still managed to be the most beautiful thing i saw at the show.
once we were done with Canada Blooms, we moved on to the actual home show. and i have to say i was really disappointed! i went with the wrong expectations, i definitely thought there would be more decorative and furniture stands - given we're not doing a big reno, i didn't find a ton that was helpful to me. 

the one thing though that i did find, and that i'm really excited about was Casalife. it's a furniture store in Liberty Village here in Toronto, and they have amazing stuff - what caught my eye at the show was a sputnik chandelier. but, for my budget friendly ears, i was the most excited when she told me of their upcoming warehouse sale. it takes place April 4 - 7 out on Brown's Line - and keep your eyes peeled here as we get closer to the date.

overall, i would have been disappointed if i had paid full price. but, it was a really great (relatively) cheap Friday night out and I had a good time.

Monday, March 18, 2013

hair disaster! DIY solution.

so my hair is FRIED. which i can only blame on over bleaching and use of heat stylers, pretty constantly. unfortunately as a reflection, my hair is falling out all over the place - well not falling out so much as snapping off.

which means i'm pretty desperate to find a solution before i lose all my hair. insert a DIY hair mask, with ingredients i had in my kitchen. oil is a great moisturizer and will help my dry and fried hair. egg has protein which when your hair is over processed it is in great need of.


Ingredients:
2 Eggs
4 tables spoons of olive oil
Saran wrap

Mix the ingredients together, it will turn a light yellow and look a little fluffy when complete.


Once it's all mixed up, and ready to go, apply the mixture to dry hair, making sure to focus on the roots.  once all the mixture is in the hair, put your hair up in a top knot. i was really surprised, but the mixture doesn't drip and doesn't make the hair overly wet, nor sticky. it's actually a really perfect consistency for a hair mask.

once your hair is in a top knot, wrap your hair in saran wrap and leave on for 15 - 30 minutes.


 i left mine in for 30 minutes. when it was time to rinse it out, it was a little solid in my hair. easy to get out with a quick shampoo and conditioner to give the hair a little more moisture.

overall, the next morning i don't find it to be a miracle cure, but it is a little less awful - which given the state of my hair, is a great development! on the plus side, not being able to dye my hair will certainly help save me money in the long run.

let me know how it works for you - i certainly am curious to know how it works if you're not starting from such an awful place with your hair!

Wednesday, March 13, 2013

bye bye bar cart

ok, so i wasn't lying before when i said i had ignited a love affair with kijiji. and, after this morning, it has only got stronger. why you ask? and what could this possibly have to do with becoming debt free?

well, i love to vintage shop - spending a weekend antiquing is my idea of a good time, but i don't have the money or space to keep it all right now. so, i've opened an etsy store to resell my finds. check out Orange Cats Vintage.

as you'll see, i love brass pieces, i think they just add so much character and charm to a room. and my biggest sale to date was a recently purchased brass bar cart, that i cleaned up a little and resold for double what i paid for it! it's really interesting how when staged and with a little dusting how much better a product looks and how much more someone is willing to pay for it. it helps people to imagine what the piece could look like in their home.

the money i make from reselling these pieces will go to the debt, and make me that much closer to paying it off in its entirety.

here is the piece, once i had cleaned it up a little - the problem was saying goodbye in the end!


Tuesday, March 12, 2013

saving a BUNCH of money

alright, so bad pun should probably be ignored. but, the lesson is still a good one. i love flowers, especially tulips, and while they may be seen as an unnecessary expense, they make me happy and fighting your way out of debt can't be all sacrifices!

so, enter my solution - split up a bouquet to make several bouquets for a couple rooms in your house. i buy my flowers at Costco, and for $10 was able to fill four vases and brighten up two rooms.

you could probably add them to more rooms - but as you'll notice all flowers have to be up high where the little kitties won't eat them at my house!

in the kitchen, i filled three different size vases and they sit in the windowsill where they get great light and generally last at a minimum one week. what i especially love about this look is using old milk bottles gives the arrangements some character and a nice vintage feel.


for the bathroom, i used a vase i got for christmas which i wasn't convinced on when i opened it, but honestly couldn't love it any better at this point. the four individual flowers in their own vases really makes the bouquet fell larger than it is, and adds a nice bright touch to the washroom.


it's important to remember to keep some treats in your life - flowers once every two weeks, will not stop me from being out of debt by the end of the year, and they make me smile every time i see them!


Sunday, March 10, 2013

sunday night dinner party

this evening, we invited my parents down for sunday dinner. tradition has to date dictated that we would go there and stay for a nice roast on sunday. well, time to shake tradition.

the immediate question was what to serve, that was both reasonably priced, but also clean and healthy. the answers came quite easily - and as always thanks to Pinterest.

for our afternoon snack, as we watched the golf, we pulled together what we already had in the house - this was the norm of what you would expect - leftover quinoa salad, veggies and hummus, and less expected, but most impressive, little tuna cucumber sandwiches. this appetizer is so simple, and delicious that everyone can't help but be impressed!


the main dish was more complicated - a Chicken Tetrazzini recipe from Clean Eating Magazine. I have copied the recipe below, with my few tweaks, but you can find the original here.


INGREDIENTS:
Olive oil cooking spray
3 cups whole-wheat pasta (rigatoni, penne, sedani)
1 tbsp olive oil
2 cups cremini mushrooms, thinly sliced
1/4 cup finely diced sweet onion
1 medium carrot, peeled, halved length-wise and thinly sliced (about 1/2 cup)
1/2 tsp sea salt
2 cups low-fat, low-sodium chicken broth
1/3 cup low-fat greek yogurt
2 tbsp parsley
1 oz Parmigiano-Reggiano cheese, finely grated (about 1/3 cup), divided
1 tbsp fresh lemon juice
2 chicken breasts, torn into bite-size pieces
1/4 cup roughly chopped raw almonds, optional

INSTRUCTIONS:

  • Preheat oven to 400°F. Lightly mist an 11-cup (2.6 L) casserole dish with cooking spray; set aside.
  • Cook pasta to al dente according to package directions, drain, rinse under cold running water and drain again; set aside.   
  • Meanwhile, heat oil in a large nonstick skillet over high heat. Add mushrooms, onion and carrot and cook, stirring, for 1 minute. Add salt and continue to cook, stirring, until mushrooms are golden brown and carrot has softened, about 4 minutes. Add broth, bring to a boil, reduce heat to medium and simmer gently until carrot is tender, about 5 minutes. Transfer three-quarters of broth and half of vegetable mixture to a blender and purée until smooth. (NOTE: Be sure to cover lid of blender with a kitchen towel and hold it securely while blending to avoid any hot mixture or steam from escaping.) Add greek yogurt, parsley, half of Parmigiano-Reggiano, and lemon juice and pulse blender until mixed. Return puréed mixture to skillet and toss with pasta and chicken. Transfer mixture to prepared casserole dish, and sprinkle remaining half of Parmigiano-Reggiano and almonds, if desired, over top. Bake until sauce is bubbling and top is golden brown, about 20 to 25 minutes.


i was REALLY impressed with this recipe - it tasted great, and we were able to pre-assemble before our guests arrive meaning we could actually enjoy their company when they were with us.

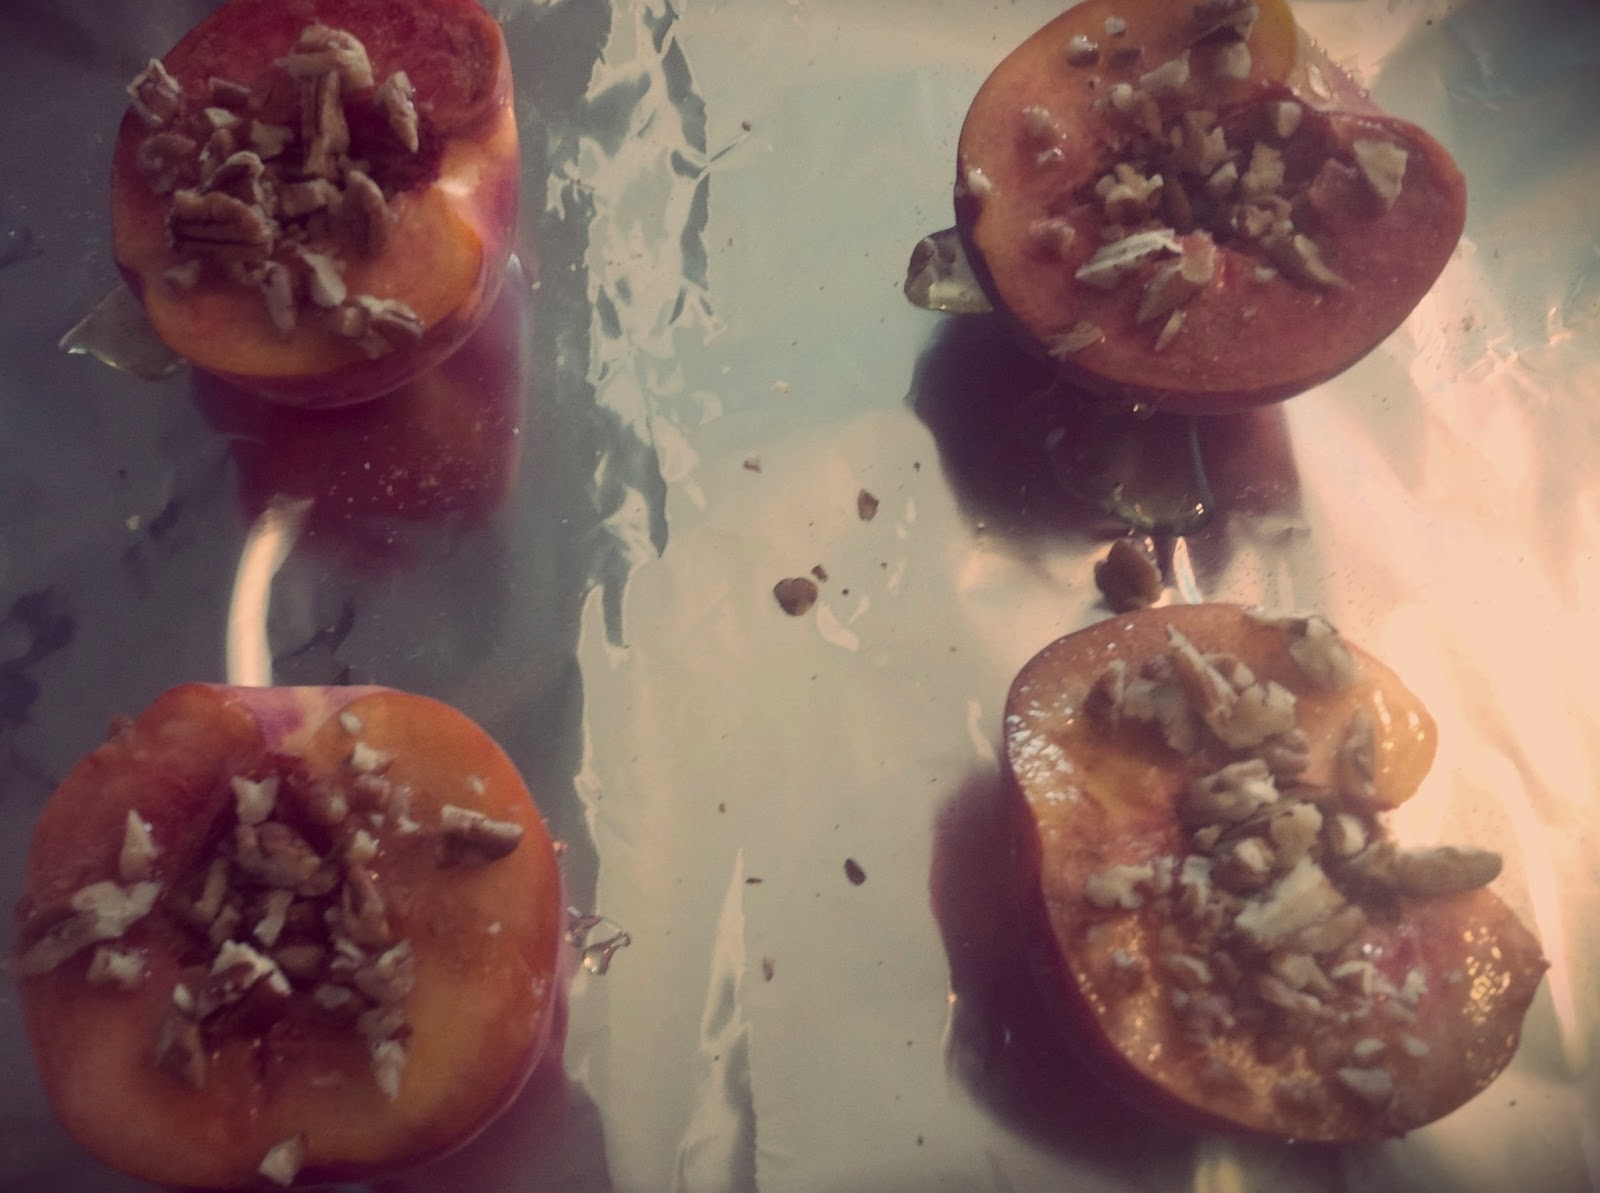
our dessert was a bit of a Pinterest inspired adventure. i'm always seeing posts for baked peaches and they look so good. i combined a few of those recipes for what i ended up making - and i couldn't help but wish we had made enough for seconds!


INGREDIENTS:
2 Medium sized, ripe peaches
1 tbsp honey, per half
1 tbsp of cinnamon for toping
1/4 cup of roughly chopped pecans

INSTRUCTIONS:
  • Pre-heat the oven to 300 degrees
  • Cut the peaches in two, remove the pit
  • Drizzle each with the honey, then sprinkle with cinnamon and pecans
  • Cook for 10 minutes, until the peaches are soft
overall, the dinner party was a success and done on a budget! let me know if you try any of the recipes and how they work for you.

Thursday, March 7, 2013

millionnaire on the couch

Long time no post, and truly no reason for that at all. At the beginning of this week, I started a new job. I now work from home, and while i'd be lying to say it's an easy transition, it certainly is revealing its benefits quite quickly. And, couldn't be more in line with my debt free in a year plan.

First of all, there is no such thing as forgetting your lunch at home, no reason to go out and buy lunch, and even better no trips to Starbucks. Take for example, the delicious yogurt parfait i made this week - a complete replica of what I was buying from Starbucks for $4.


It's easy and simple:
1/2 TBSP of Honey
Layer with 1/2 cup of 0% Greek Yogurt
Finally, top with 1/4 cup of Sugar Free granola

But, the biggest way I'm saving money, is by selling some of the old stuff I have, the stuff that has been doing nothing but gathering dust for the past 6 months. After having such good luck finding awesome stuff on Kijiji, that I'm trying the other way around.

So far I've had some bites, but in all fairness am only a couple hours in! Old nail polishes, an old mirror, and even my old Hunger Games hard cover Trliogy. 

Stay tuned for how it goes! Slow and steady on the way to millionnaire, not just debt free.